Sunday, 13 July 2008

Do you know you can draw a picture by brush in Photoshop? ^_^

I want to show many ways to use brush in Photoshop to draw picture. ^_^


First, I have an image with layers of background, tree and human with umbrella.


Then I will open layers of tree: Outline & Bark. Click layer outline then choose Multiply in Blending Modeand choose opacity 30%. You will see picture look like more beautiful. ^_^


Second, You use Lock transparent Pixels in Layers or Create new Layer and Group with old layer to draw by brush. Then you target Layer Bark and choose Layer>New>layer. In New Player bar> check Use Previous layer to create Clipping Mask and name highlights. When you did, we will have result.


So you can choose Brush tool>Soft Round 21 -pixels and Medium warm Brown and Pale cool Brown, Blur tool to start draw a tree as my example ^_^


Now you use brush tool and choose Dune Glass with 60 pxl and color ( R=230, B=171, G=235) + (R=186. G = 196, B=93) then you draw in new layer (Grass) and we have picture


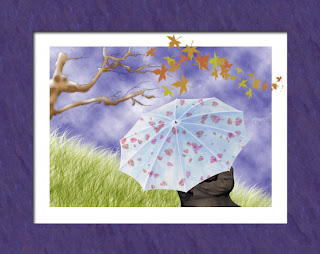
Final, we will open all layers about human and umbrella. We will create colours in Swatches box with 2 colours (R=150,G=193,B=219) and (R=132,G=143,B=199). You also find Watercolor Light Opacity in Wet Media Brushes of Brushes box>choose it with 25 pixels


And you draw the white color on umbrella and we have:


The last, we use Scattered Mapple Leaves with 65px in Brushes box with Shape Dynamics>Fade 50 and Roundness Jitter 40% + Scattering> Scatter 265% and count 1. Then you create a border and I have a picture final ^_^


So you can see it so interesting and I share it to you. If you have some ideas better than, you can contact to me. Thanks for reading ! ^_^


Photoshop Cont

In this week, I plan to introducce to everyone about web design but my blog can't upload flash video and I don't why so I will continue sharing you about photoshop. I know many ways to work in photoshop and I introduce to you.

I will introduce to everyone about many ways to work with select tools : Marquee, Lasso, Magic Wand and Move.

I have an image below and I will use this picture to make it together.


1. I will use Rectangular Marquee tool to select book in this picture.


You use Elliptical Marquee to select oval ( you move and drag from top to bottom to make an oval, then you should keep mouse and use spacebar to move oval to correct the oval) and earth ( you move and drag from center of earth to make an oval, then you also keep mouse + alt to move selection into center and also keep mouse and alt together. After that, you drag selection bigger and use ctr+alt+left mouse + spacebar to select earth)


You can use Magic Wand tool to select number 5 ( keep Shift to select the area other)


You can use Lasso tool to drag a pen and use Magnetic Lasso to drag a lock.


You can use Rectangular Marquee tool and Magic Wand tool together to drag a flower.


2.After you drag and cut, you move it and make it together.


First you move earth to the top of book by Move tool and use Image>Adjustments>Invert. After that you copy earth by keep Alt + drag. Final, you scale 3 earth.


Then you can continue doing with many other objects


Finally we will a final image.


Sunday, 6 July 2008

Do you know there are some interesting about Photoshop? ^_*

In photoshop, I find there are many tools which are very helpful in fixing picture. Now I will intro duce to you about them. ^^

This is an original image which I get from CD at home.


You can see in this image, it 's not good and I will share you how to make it better ^_^

Fisrt, you use Crop tool to make it straight.


And you continue making image more colourful by Image>Adjustment>. In this, you can use Levels, Curves, Equalize ... and then a image become :


Moreover, you can use Replace Color in Image>Adjustments to replace again a wall on top of image to make it better than and this is result:


After that, I use Dodge tool to make the window screen lighter.^_^


Finally, I will use Unsharp Mask in Filter>Sharpen to make iamage become sharper. And this is a final image after doing ^_^:


You can see photoshop so interesting. I like it so much and if you are too, you can contact me to share experience about photoshop together. I welcome to every peoples who want to work together and share experience.
So I 'll introduce to you more about photoshop that I know in next. ^_^
To be continue ...

First Entry: Let discover the Secret of Photoshop ^_^

I haven't written blog before so I don't know how to do an attractive blog to everyone. However, I will try to do more about this.

Firstly, I love many stories about Greek mythology so I want to find many images of sacred saga theocracy.I will introduce to every people about many images of sacred saga theocracy. They are made by FUTURE studio and in website Graceful-Lament.com. They are so beautiful but because some colours in them not clearly so I want to make it become better.Now these are many original images that I got from website.


This is an image of APHRODITE


This is an image of DEMETER


This is an image of ATHENA


This is an image of ARTEMIS


This is an image of ARES


This is an image of APOLLO


This is an image of HERMES


This is an image of HERA


This is an image of HEPHAISTOS


This is an image of HADES


This is an image of ELIS


This is an image of ZEUS


And I use many images before to make in Photoshop. After that, they are so nice in my eyes.^_^


I will do example an image of APHRODITE. In this image, you can see a colour of image so bad and poor. So I will correct it little by tool Image>Adjustments in Photoshop.


First, you always remember Duplicate image ^-^


In Image>Adjustments> you can use levels, curves, color balance, brightness/contrast, Hue/Saturation to make image better. Now I will give you image after I did it.


So you can see it's better than. ^_^. If you like, you can do with many images other and make it as you like.